前言
阔别三载,终得归来。然俗务缠身,案牍劳形,鲜有余暇耕耘这一方文字天地。幸而始终未敢忘怀,域名与服务器皆按期续存,这片园地得以常驻网海。纵偶有停更之虞,亦必重拾笔墨,再叙衷肠。各位久违了!
话不多说,进入今天的主题。因为工作原因,研究过一段时间的AI视觉识别。最近在玩网易的“燕云十六声”,其中有个玩法是“丝竹雅韵”,即弹琴(音符落下按键)。奈何自己对这方面确实手残,手忙脚乱按一通,奖励啥都没捞到,所以想着能否用AI来识别,全程帮我操作呢?
虽然网上有现成的解决方案,但是还是类似于按键精灵的流程,提前录入键,感觉这样不优雅。如果用AI视觉的方式去实现,那么完全可以兼容所有的曲谱,甚至对于相似类型的玩法,都可以做到兼容。
此外,针对这种场景高度固定的情况(音符图标几乎不会发生变化,仅背景有些许不同),只需用最小规格的模型,再加上极少量的训练数据,就能实现极高的识别精度。这主要得益于YOLO算法本身出色的泛化能力和高效的识别性能。通过本文,掌握了AI视觉的识别原理,对于其他图像识别,比如人体识别、火灾识别、车辆识别等,都可以做到手到擒来。
YOLO项目文档:主页 -Ultralytics YOLO 文档
本文我们将从数据标注、模型训练、识别结果应用来展开。
准备工作
硬件:本机电脑(跑游戏)、跑AI的电脑(最好有),带显卡,级别至少在RTX2060以上,4G以上显存。
软件:Python3.12、YOLO(Ultralytics)、Torch、DD按钮、labelme(数据标注软件)
PS. 为啥要有第二台电脑?因为在实测中,不知是windows那诡异的前后台资源分配规则,还是游戏本身的问题,当把识别程序切到后台时,分配的显卡资源暴跌了10倍。不过,如果你有办法解决这个问题,或者CPU足够强,也可以自行解决或者用CPU跑,这样就不用2台电脑了。
安装软件环境
Python安装不说了,我装的是3.12.3。装好后,新建一个项目,接下来装Pytorch和Ultralytics。
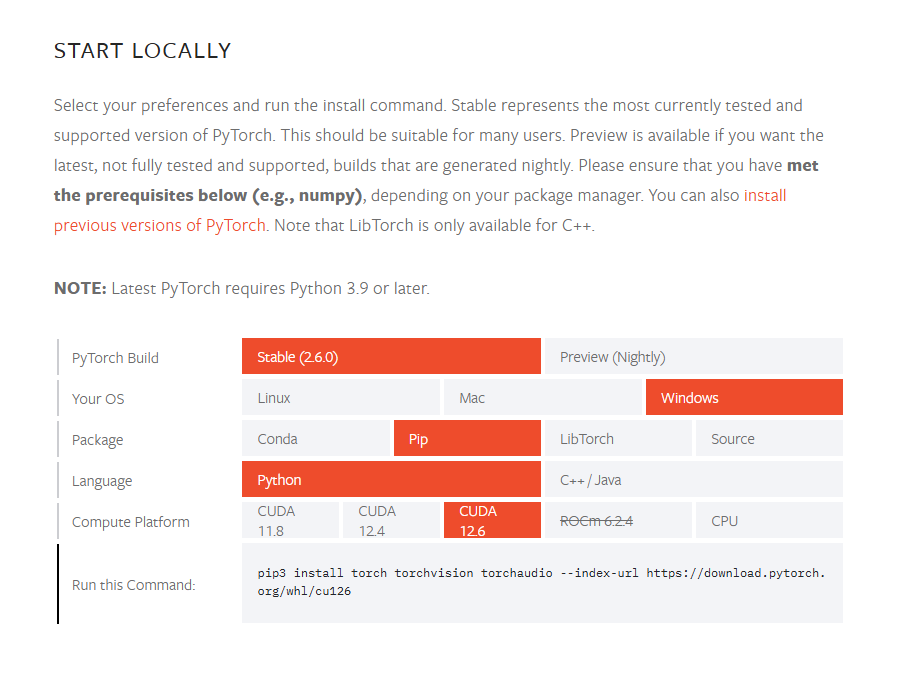
1. torch安装:
如图,在最底下获取安装命令,直接PIP安装即可,无需额外手动装CUDA和CuDnn。
2. 安装Ultralytics
执行命令:pip3 install ultralytics
打开链接:GitHub – ultralytics/ultralytics: Ultralytics YOLO11 🚀
往下翻找到模型下载,下载yolo11n模型,放到项目文件夹下。

3. 下载dd key
这个组件是第三方实现的游戏按键控制,因为常规的键鼠控制方法会被游戏屏蔽。该组件启动后会联网验证,请大家自行选择。
下载地址:GitHub – ddxoft/master 下载压缩包,解压出来找到dd43390.dll,放到项目的lib目录下。
4. 安装labelme
pip install labelme即可。
数据标注
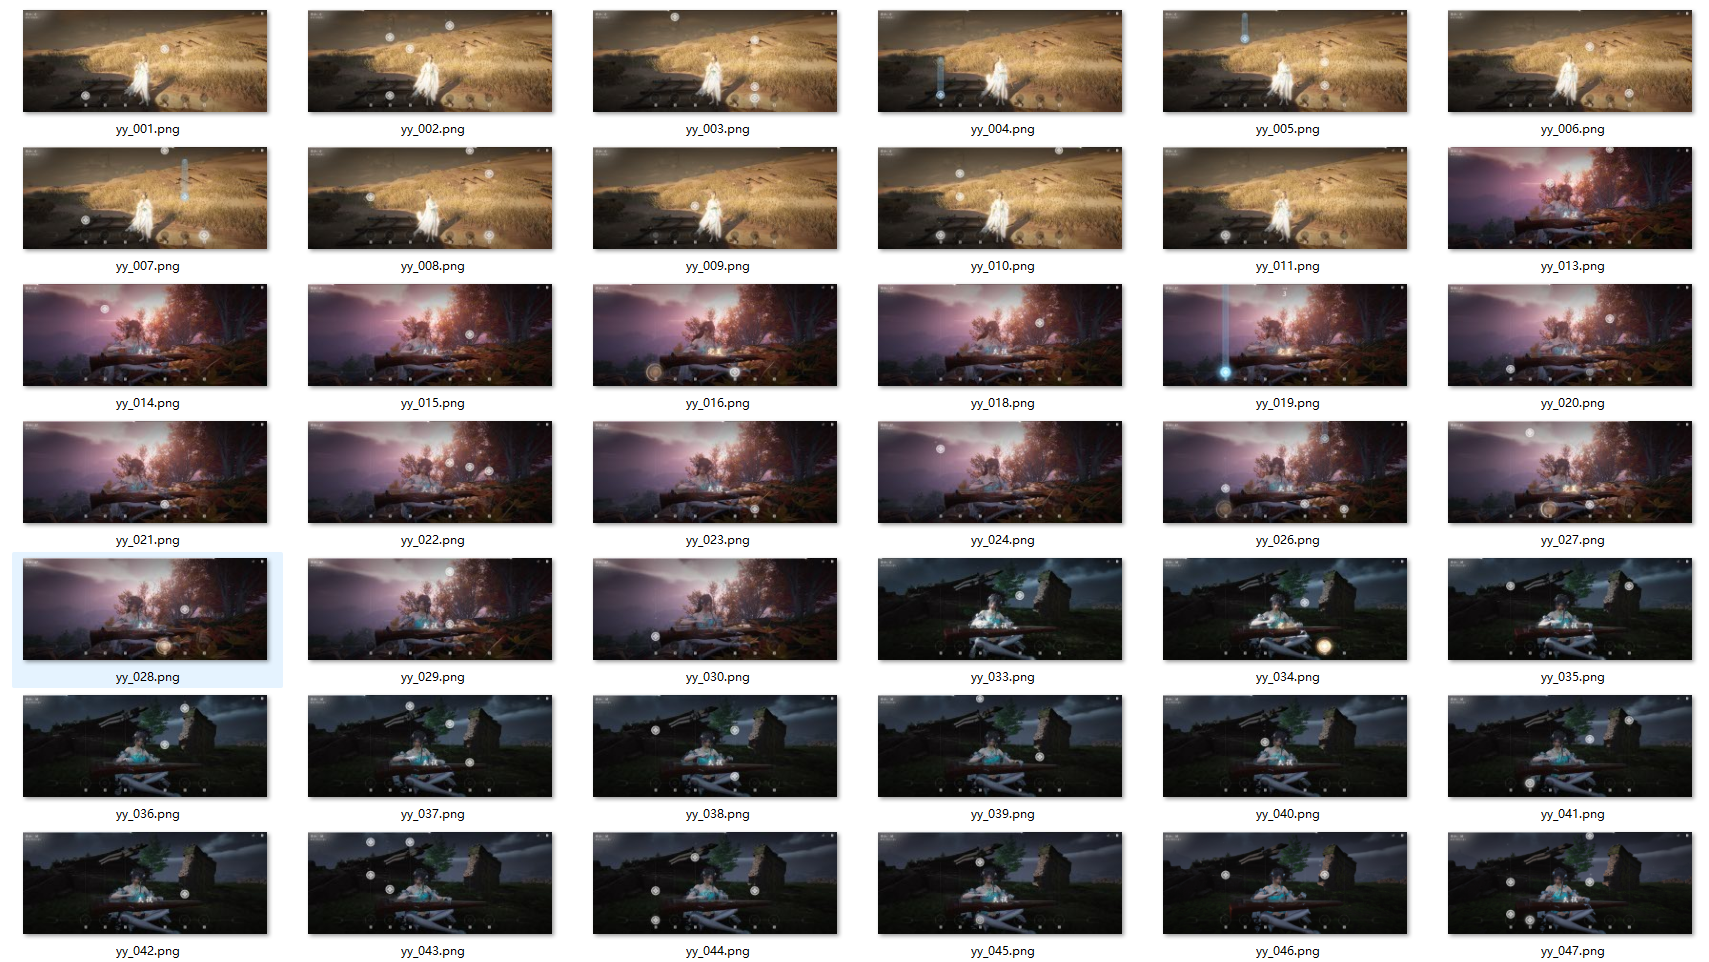
因为识别场景较为拟合,所以我们只需要少量的数据集手动标注一下就行了。打开游戏,进入“丝竹雅韵”界面,从不同背景截取100张左右的图片,图片内容包含各个阶段的音符图标。我这里截了150张左右:
找个地方建立一个images文件夹,把图片都放进去,再建立一个labels文件夹。
接下来启动labelme软件,在控制台输入 labelme 执行。
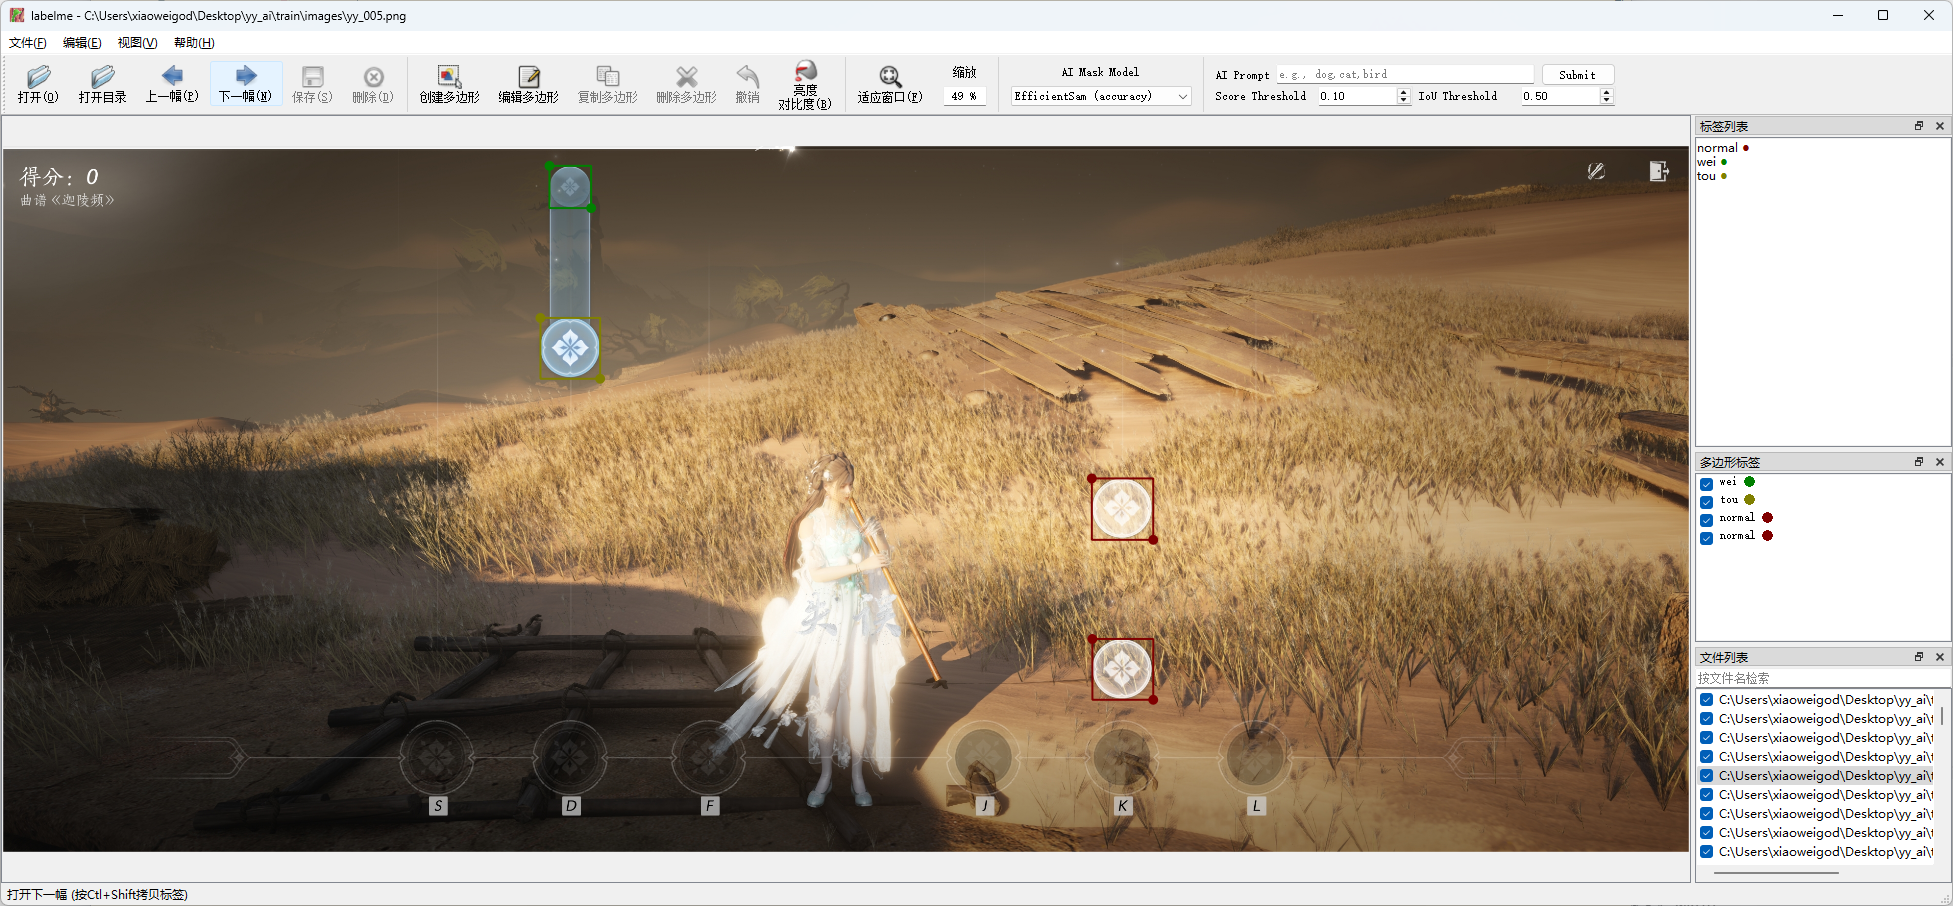
软件主界面中,选择“打开目录”,选择images文件夹;然后文件-更改输出目录,选择labels文件夹。选择好之后,就可以开始标注了。在图片上右键“创建矩形”,框选出所有的音符,如图。我把标注的音符类型分为了3类:普通音符、长按音符的头、长按音符的尾,类别分别为0、 1、 2。按AD可以切换前一张、后一张图片,全部标注完成即可。标注坐标数据存在labels文件夹下。
数据增强、分类
对于视觉识别模型,训练数据量越大、识别效果越好。在我们现有标注数据量较少的情况下,我们可以对现有图片进行旋转、裁剪、变更色彩、亮度等形式,进行扩充。为提高效率,写个数据增强脚本即可,变换图片的同时,重新计算标注坐标,生成新的label。以下脚本,定义输入的images/labels目录和输出的images/labels目录,即可自动完成数据增强。
import os
import cv2
import json
import numpy as np

image_path = r"C:\Users\xiaoweigod\Desktop\yy_ai\train\images"
label_path = r"C:\Users\xiaoweigod\Desktop\yy_ai\train\labels"
output_img_path = r"C:\Users\xiaoweigod\Desktop\yy_ai\train_out\images"
output_lbl_path = r"C:\Users\xiaoweigod\Desktop\yy_ai\train_out\labels"
os.makedirs(output_img_path, exist_ok=True)
os.makedirs(output_lbl_path, exist_ok=True)

name2id = {"normal": 0, "tou": 1, "wei": 2}

def save_yolo_label(path, boxes, img_w, img_h):
    with open(path, "w") as f:
        for cls_id, pts in boxes:
            pts = np.array(pts, dtype=np.float32)
            x, y, w, h = cv2.boundingRect(pts)
            x_center = (x + w / 2) / img_w
            y_center = (y + h / 2) / img_h
            w_norm = w / img_w
            h_norm = h / img_h
            f.write(f"{cls_id} {x_center:.6f} {y_center:.6f} {w_norm:.6f} {h_norm:.6f}\n")

def augment(file):
    name, ext = os.path.splitext(file)
    img_fp = os.path.join(image_path, file)
    json_fp = os.path.join(label_path, f"{name}.json")
    if not os.path.exists(json_fp):
        return

    img = cv2.imread(img_fp)
    h, w = img.shape[:2]

    with open(json_fp, "r", encoding="utf-8") as f:
        data = json.load(f)

    # 收集标注点
    shapes = []
    for shape in data["shapes"]:
        label = shape["label"].lower()
        if label not in name2id:
            continue
        cls_id = name2id[label]
        pts = shape["points"]
        shapes.append((cls_id, pts))

    def save(img_out, boxes_out, suffix):
        img_name = f"{name}_{suffix}.jpg"
        img_path = os.path.join(output_img_path, img_name)
        lbl_path = os.path.join(output_lbl_path, f"{name}_{suffix}.txt")
        cv2.imwrite(img_path, img_out)
        save_yolo_label(lbl_path, boxes_out, img_out.shape[1], img_out.shape[0])

    # 原图
    save(img, shapes, "orig")

    # 左右翻转
    flipped = cv2.flip(img, 1)
    flipped_shapes = []
    for cls_id, pts in shapes:
        new_pts = [[w - x, y] for x, y in pts]
        flipped_shapes.append((cls_id, new_pts))
    save(flipped, flipped_shapes, "flip")

    # 亮度增强
    bright = cv2.convertScaleAbs(img, alpha=1.0, beta=50)
    save(bright, shapes, "bright")

    # 颜色增强
    hsv = cv2.cvtColor(img, cv2.COLOR_BGR2HSV)
    hsv[..., 1] = np.clip(hsv[..., 1] + 50, 0, 255)
    color_img = cv2.cvtColor(hsv, cv2.COLOR_HSV2BGR)
    save(color_img, shapes, "color")

    # 仿射缩放 + 平移
    scale = 1.2
    tx, ty = 30, 20
    M = np.array([
        [scale, 0, tx],
        [0, scale, ty]
    ], dtype=np.float32)
    scaled_img = cv2.warpAffine(img, M, (int(w * scale + tx), int(h * scale + ty)), borderValue=(255, 255, 255))

    scaled_shapes = []
    for cls_id, pts in shapes:
        new_pts = [[x * scale + tx, y * scale + ty] for x, y in pts]
        scaled_shapes.append((cls_id, new_pts))
    save(scaled_img, scaled_shapes, "scale")

# 删除无标注图像
for file in os.listdir(image_path):
    name, ext = os.path.splitext(file)
    json_file = os.path.join(label_path, f"{name}.json")
    if not os.path.exists(json_file):
        os.remove(os.path.join(image_path, file))
        print(f"已删除无标注图像:{file}")

# 批量处理
for file in os.listdir(image_path):
    if file.lower().endswith((".jpg", ".png")):
        augment(file)

print("数据增强完成")
另外,对于模型训练,我们需要把标注的图片分为训练集和验证集(数据量大的话还有测试集)。训练集是训练模型识别目标的,验证集是让训练中的模型去验证识别效果的。我们按照训练集/验证集比例8:2的数据量进行分类。修改脚本中的输入输出路径,运行后,我们就有了训练集和验证集。在train和val文件夹下,都有images和labels文件夹,分别存放图片和标注坐标。
C:\Users\xiaoweigod\Desktop\yy_ai\train_out\
├── train\
│   ├── images\
│   └── labels\
├── val\
    ├── images\
    └── labels\
import os
import random
import shutil

# 设置随机种子以确保结果可复现
random.seed(42)

# 原始数据路径
image_dir = r"C:\Users\xiaoweigod\Desktop\yy_ai\images"
label_dir = r"C:\Users\xiaoweigod\Desktop\yy_ai\labels"

# 目标路径
train_dir = r"C:\Users\xiaoweigod\Desktop\yy_ai\train_out\train"
val_dir = r"C:\Users\xiaoweigod\Desktop\yy_ai\train_out\val"

train_image_dir = os.path.join(train_dir, "images")
val_image_dir = os.path.join(val_dir, "images")
train_label_dir = os.path.join(train_dir, "labels")
val_label_dir = os.path.join(val_dir, "labels")

# 创建目标目录
for dir_path in [train_image_dir, train_label_dir, val_image_dir, val_label_dir]:
    os.makedirs(dir_path, exist_ok=True)

# 获取所有图像文件
image_files = [f for f in os.listdir(image_dir) if f.lower().endswith(('.jpg', '.png'))]

# 打乱文件列表
random.shuffle(image_files)

# 计算划分索引
split_index = int(len(image_files) * 0.8)

# 划分训练集和验证集
train_files = image_files[:split_index]
val_files = image_files[split_index:]

# 移动
def move_files(file_list, src_img_dir, src_lbl_dir, dst_img_dir, dst_lbl_dir):
    for img_name in file_list:
        name, _ = os.path.splitext(img_name)
        label_name = f"{name}.txt"

        src_img = os.path.join(src_img_dir, img_name)
        src_lbl = os.path.join(src_lbl_dir, label_name)

        dst_img = os.path.join(dst_img_dir, img_name)
        dst_lbl = os.path.join(dst_lbl_dir, label_name)

        shutil.move(src_img, dst_img)
        if os.path.exists(src_lbl):
            shutil.move(src_lbl, dst_lbl)

# 移动文件
move_files(train_files, image_dir, label_dir, train_image_dir, train_label_dir)
move_files(val_files, image_dir, label_dir, val_image_dir, val_label_dir)

print(f"数据集划分完成:训练集 {len(train_files)} 张,验证集 {len(val_files)} 张。")
接下来写个脚本,把labelme的标注格式转换为YOLO的标注格式。YOLO需要归一化坐标,每张图片一个txt文件(txt文件和图片同名,扩展格式不同),每行一个标注点。
import os
import json

# 设置类别名称和对应的索引
class_list = ['normal', 'tou', 'wei']
class_name_to_id = {name: idx for idx, name in enumerate(class_list)}

# 设置数据集路径
base_dir = r'C:\Users\xiaoweigod\Desktop\yy_ai\train_out'
datasets = ['train', 'val']

for dataset in datasets:
    image_dir = os.path.join(base_dir, dataset, 'images')
    label_dir = os.path.join(base_dir, dataset, 'labels')

    for filename in os.listdir(label_dir):
        if not filename.endswith('.json'):
            continue

        json_path = os.path.join(label_dir, filename)
        with open(json_path, 'r', encoding='utf-8') as f:
            data = json.load(f)

        image_path = os.path.join(image_dir, os.path.basename(data['imagePath']))
        if not os.path.exists(image_path):
            print(f"图像文件不存在:{image_path}")
            continue

        # 获取图像宽度和高度
        width = data.get('imageWidth')
        height = data.get('imageHeight')
        if width is None or height is None:
            print(f"图像尺寸信息缺失:{json_path}")
            continue

        yolo_lines = []
        for shape in data['shapes']:
            label = shape['label']
            if label not in class_name_to_id:
                print(f"未识别的类别:{label}")
                continue
            class_id = class_name_to_id[label]

            points = shape['points']
            if len(points) != 2:
                print(f"标注点数量错误:{points}")
                continue

            x1, y1 = points[0]
            x2, y2 = points[1]
            x_min = min(x1, x2)
            y_min = min(y1, y2)
            x_max = max(x1, x2)
            y_max = max(y1, y2)

            # 计算归一化的中心坐标和宽高
            x_center = (x_min + x_max) / 2 / width
            y_center = (y_min + y_max) / 2 / height
            bbox_width = (x_max - x_min) / width
            bbox_height = (y_max - y_min) / height

            yolo_line = f"{class_id} {x_center:.6f} {y_center:.6f} {bbox_width:.6f} {bbox_height:.6f}"
            yolo_lines.append(yolo_line)

        # 保存为 YOLO 格式的 .txt 文件
        txt_filename = os.path.splitext(filename)[0] + '.txt'
        txt_path = os.path.join(label_dir, txt_filename)
        with open(txt_path, 'w', encoding='utf-8') as f:
            f.write('\n'.join(yolo_lines))

        print(f"已转换:{json_path} -> {txt_path}")
至此,我们的标注数据准备完成。
训练模型
接下来对模型进行训练,因为训练的是最小的模型,所以2060这种显卡也能用,当然,性能更好、显存更大的显卡训练速度更快。
博主使用的是RTX4070TiSuper显卡,16G显存,训练图片700张,训练300轮约需10-15分钟。
接下来,先写一个训练配置文件:data.yaml,修改里面训练集和验证集的实际目录,最后把配置文件放在项目根目录。
path: C:/Users/xiaoweigod/Desktop/yy_ai/train_out  # 根目录
train: train/images        # 训练图像子路径
val: val/images            # 验证图像子路径

nc: 3                      # 类别数
names: ["normal", "tou", "wei"]  # 类别名称,顺序要和标签 class_id 一致
接着写训练脚本:train.py,放在项目根目录。前面下载的yolo11n.pt也记得放到根目录。
其中,epochs为训练轮数,这里选择300轮;workers线程数,这里选择16;device为0则指代显卡;batch为-1,让yolo自动根据显存设置训练批次大小。
from ultralytics import YOLO

if __name__ == '__main__':
    model = YOLO("yolo11n.pt")

    model.train(
        data="data.yaml",
        epochs=300, workers=16,
        device="0", batch=-1
    )

    model.val()
接着执行:python train.py。就开始训练了。
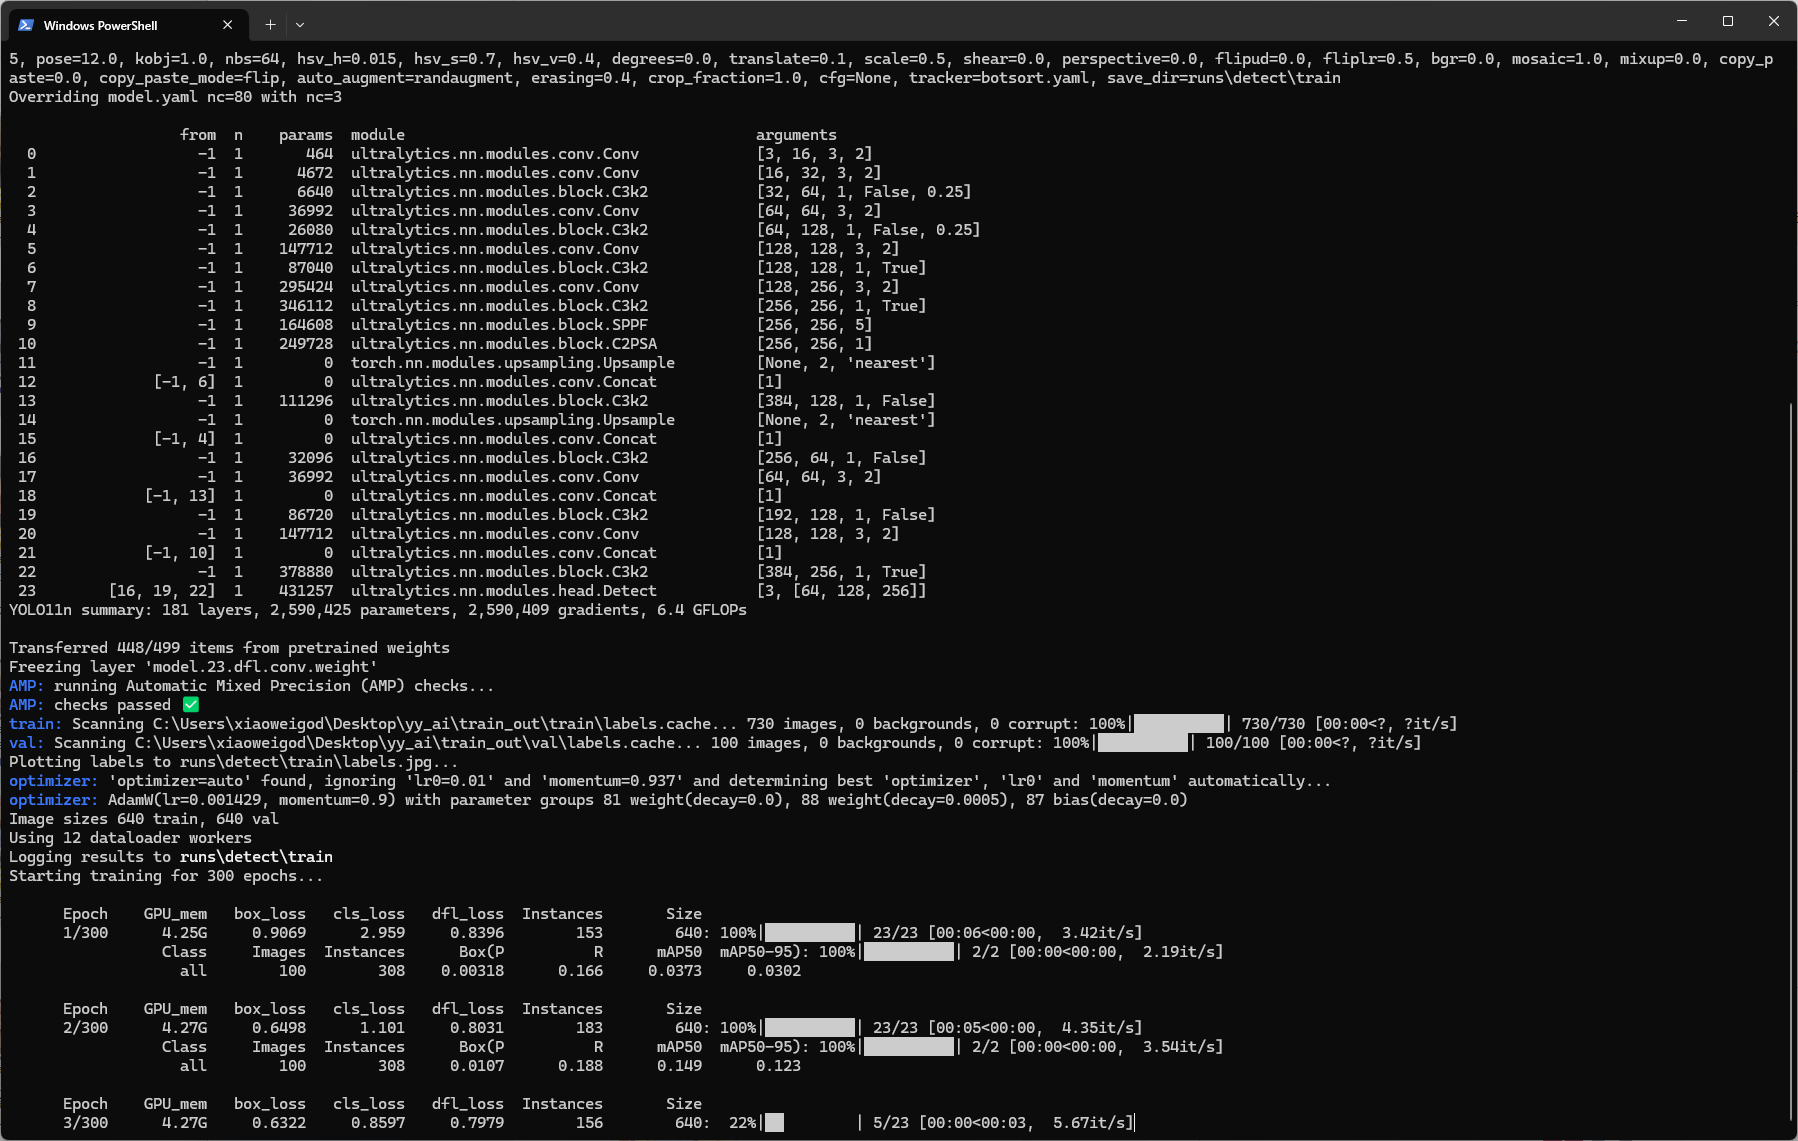
训练指标速看:
1. box_loss 衡量预测框和真实框的偏差,越低越好,0.3以下效果就非常好了。
2. cls_loss 表示模型预测类别与真实类别的差距,越低越好,0.5以下优秀。
3. dfl_loss 用于边框回归的细化,越低越好,0.4以下优秀。
4. Box(p) 预测为正的样本中有多少是对的,越接近于1越好
5. R Recall,所有正样本中被检测出来的比例,越接近于1越好
6. mAP50(关键指标) IoU=0.5 时的平均精度,越接近1越好(检测目标能力)
7. mAP50-90(关键指标) 多阈值下的平均精度(IoU 0.5~0.95),越接近1越好(检测定位能力)
如果连续50轮训练指标没有变化,那么模型会自动提前结束训练。训练完成后,到runs\detect\train\weights下找模型文件,有last.pt和best.pt,分别为最后一轮训练生成的模型和效果最好的模型。一般选择best.pt即可。
我们把best.pt复制出来,在项目新建个文件夹pt,把模型放进文件夹。
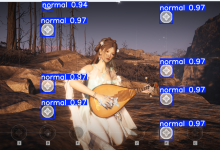
接下来手动验证下识别效果,写一个test.py来测试。
from ultralytics import YOLO
import cv2
import numpy as np
import os

model = YOLO("./pt/best.pt")

img_path = "./test_images/4.png"
img = cv2.imread(img_path)

#  按高度1080等比例缩放图像
target_height = 1080
h, w = img.shape[:2]
scale = target_height / h
resized_img = cv2.resize(img, (int(w * scale), target_height))

results = model(resized_img, verbose=False)

for box in results[0].boxes:
    cls_id = int(box.cls[0])
    conf = float(box.conf[0])
    cx, cy, bw, bh = box.xywh[0].tolist()

    name = model.names[cls_id]
    print(
        f"识别到:{name} (ID={cls_id}), 置信度={conf:.2f}, 坐标(center_x, center_y, w, h)=({cx:.1f}, {cy:.1f}, {bw:.1f}, {bh:.1f})")

annotated_img = results[0].plot()
cv2.imshow("YOLOv8 Detection (1080p)", annotated_img)
cv2.waitKey(0)
cv2.destroyAllWindows()
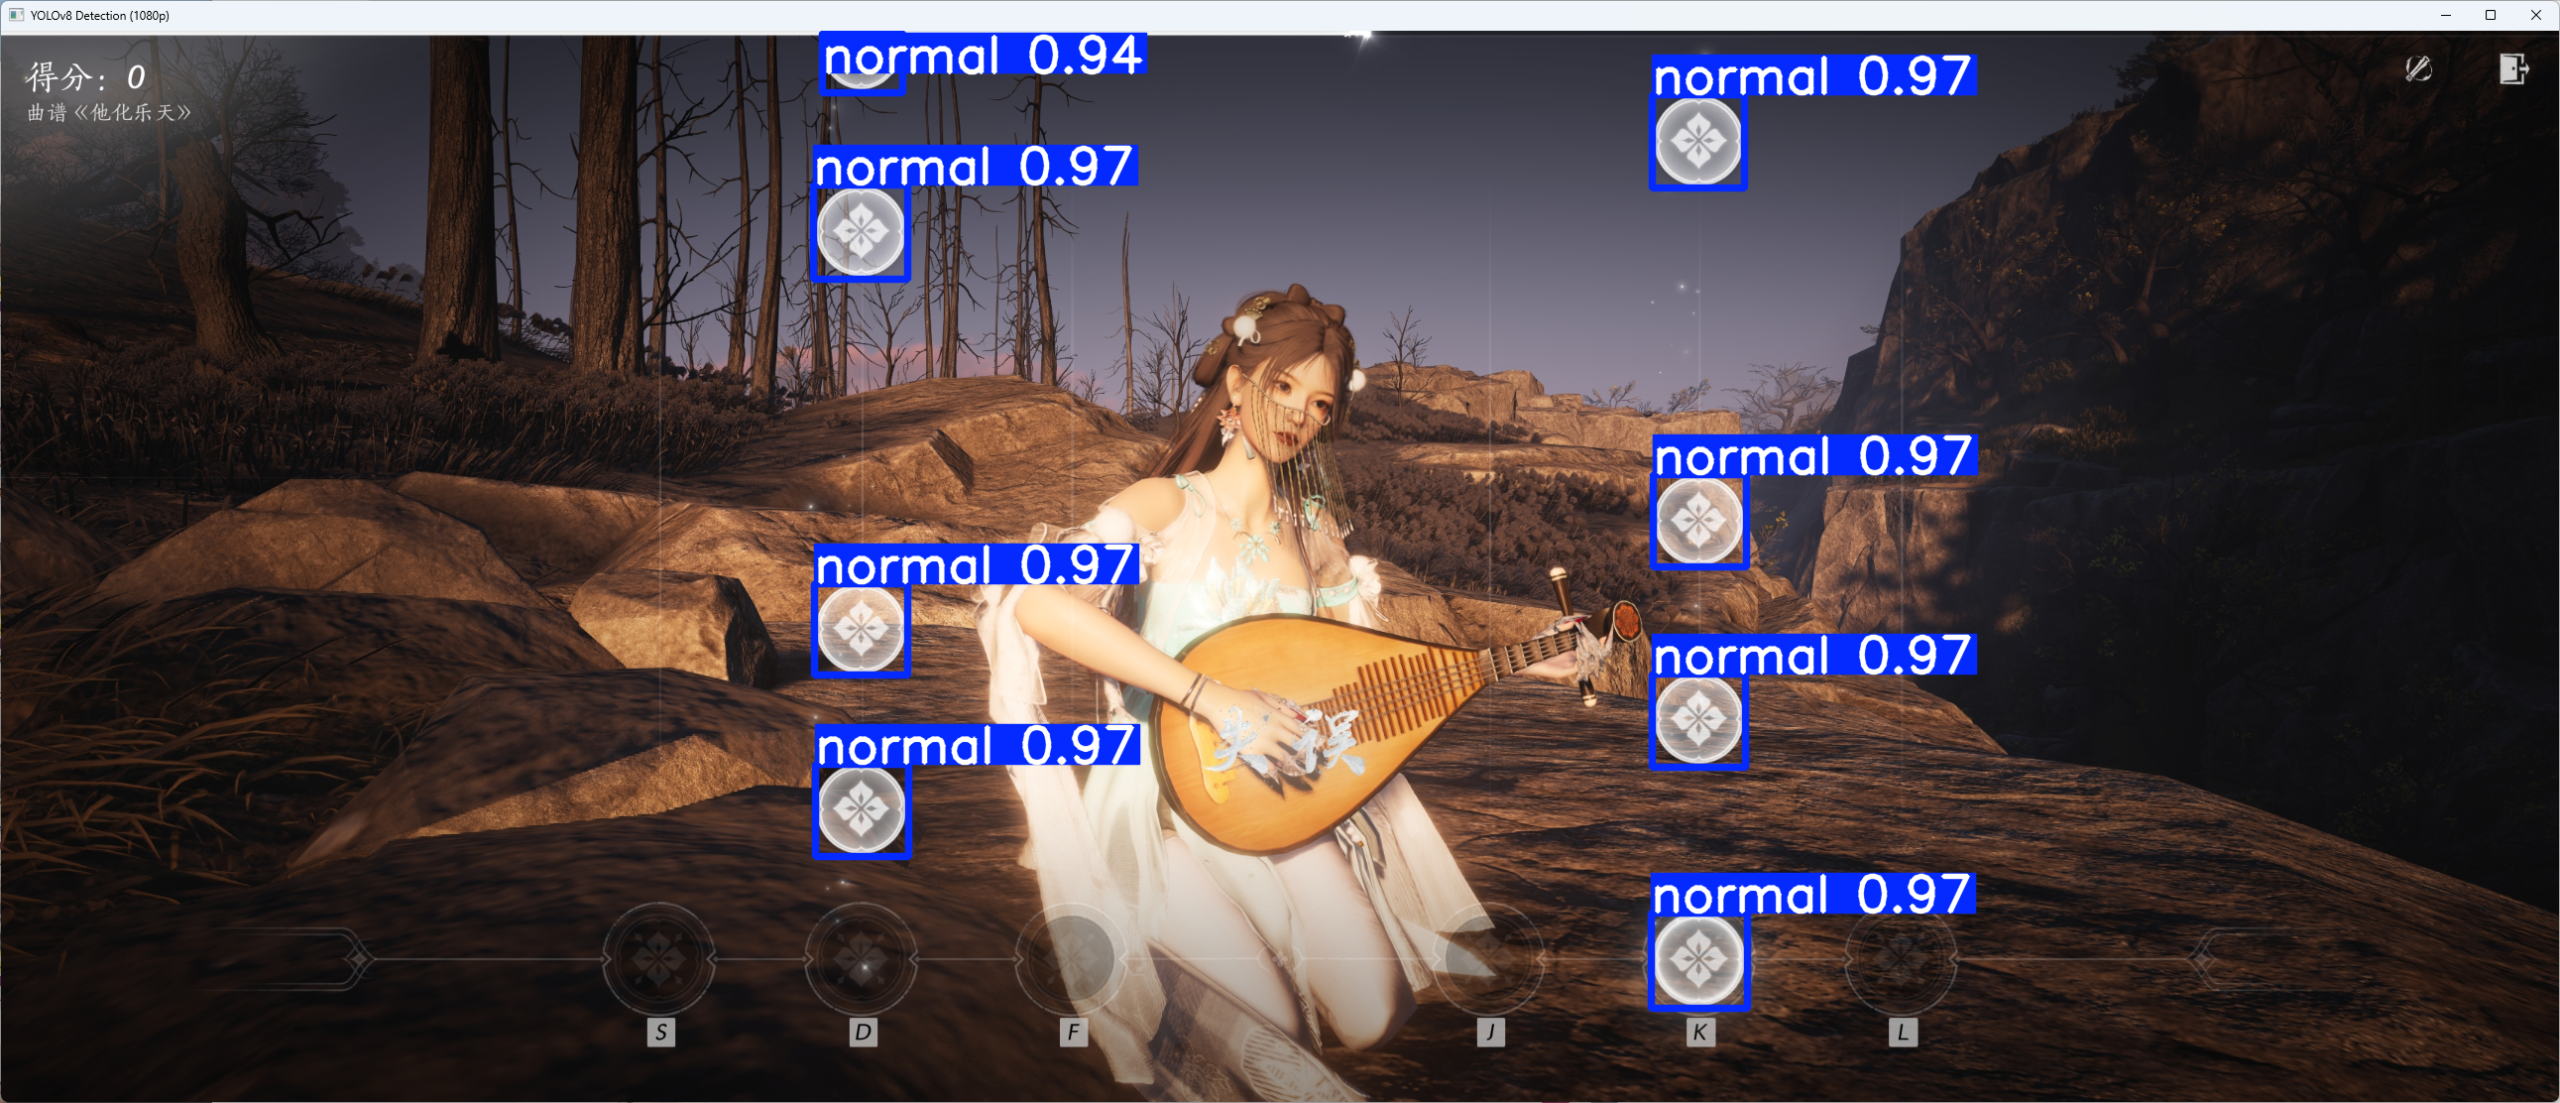
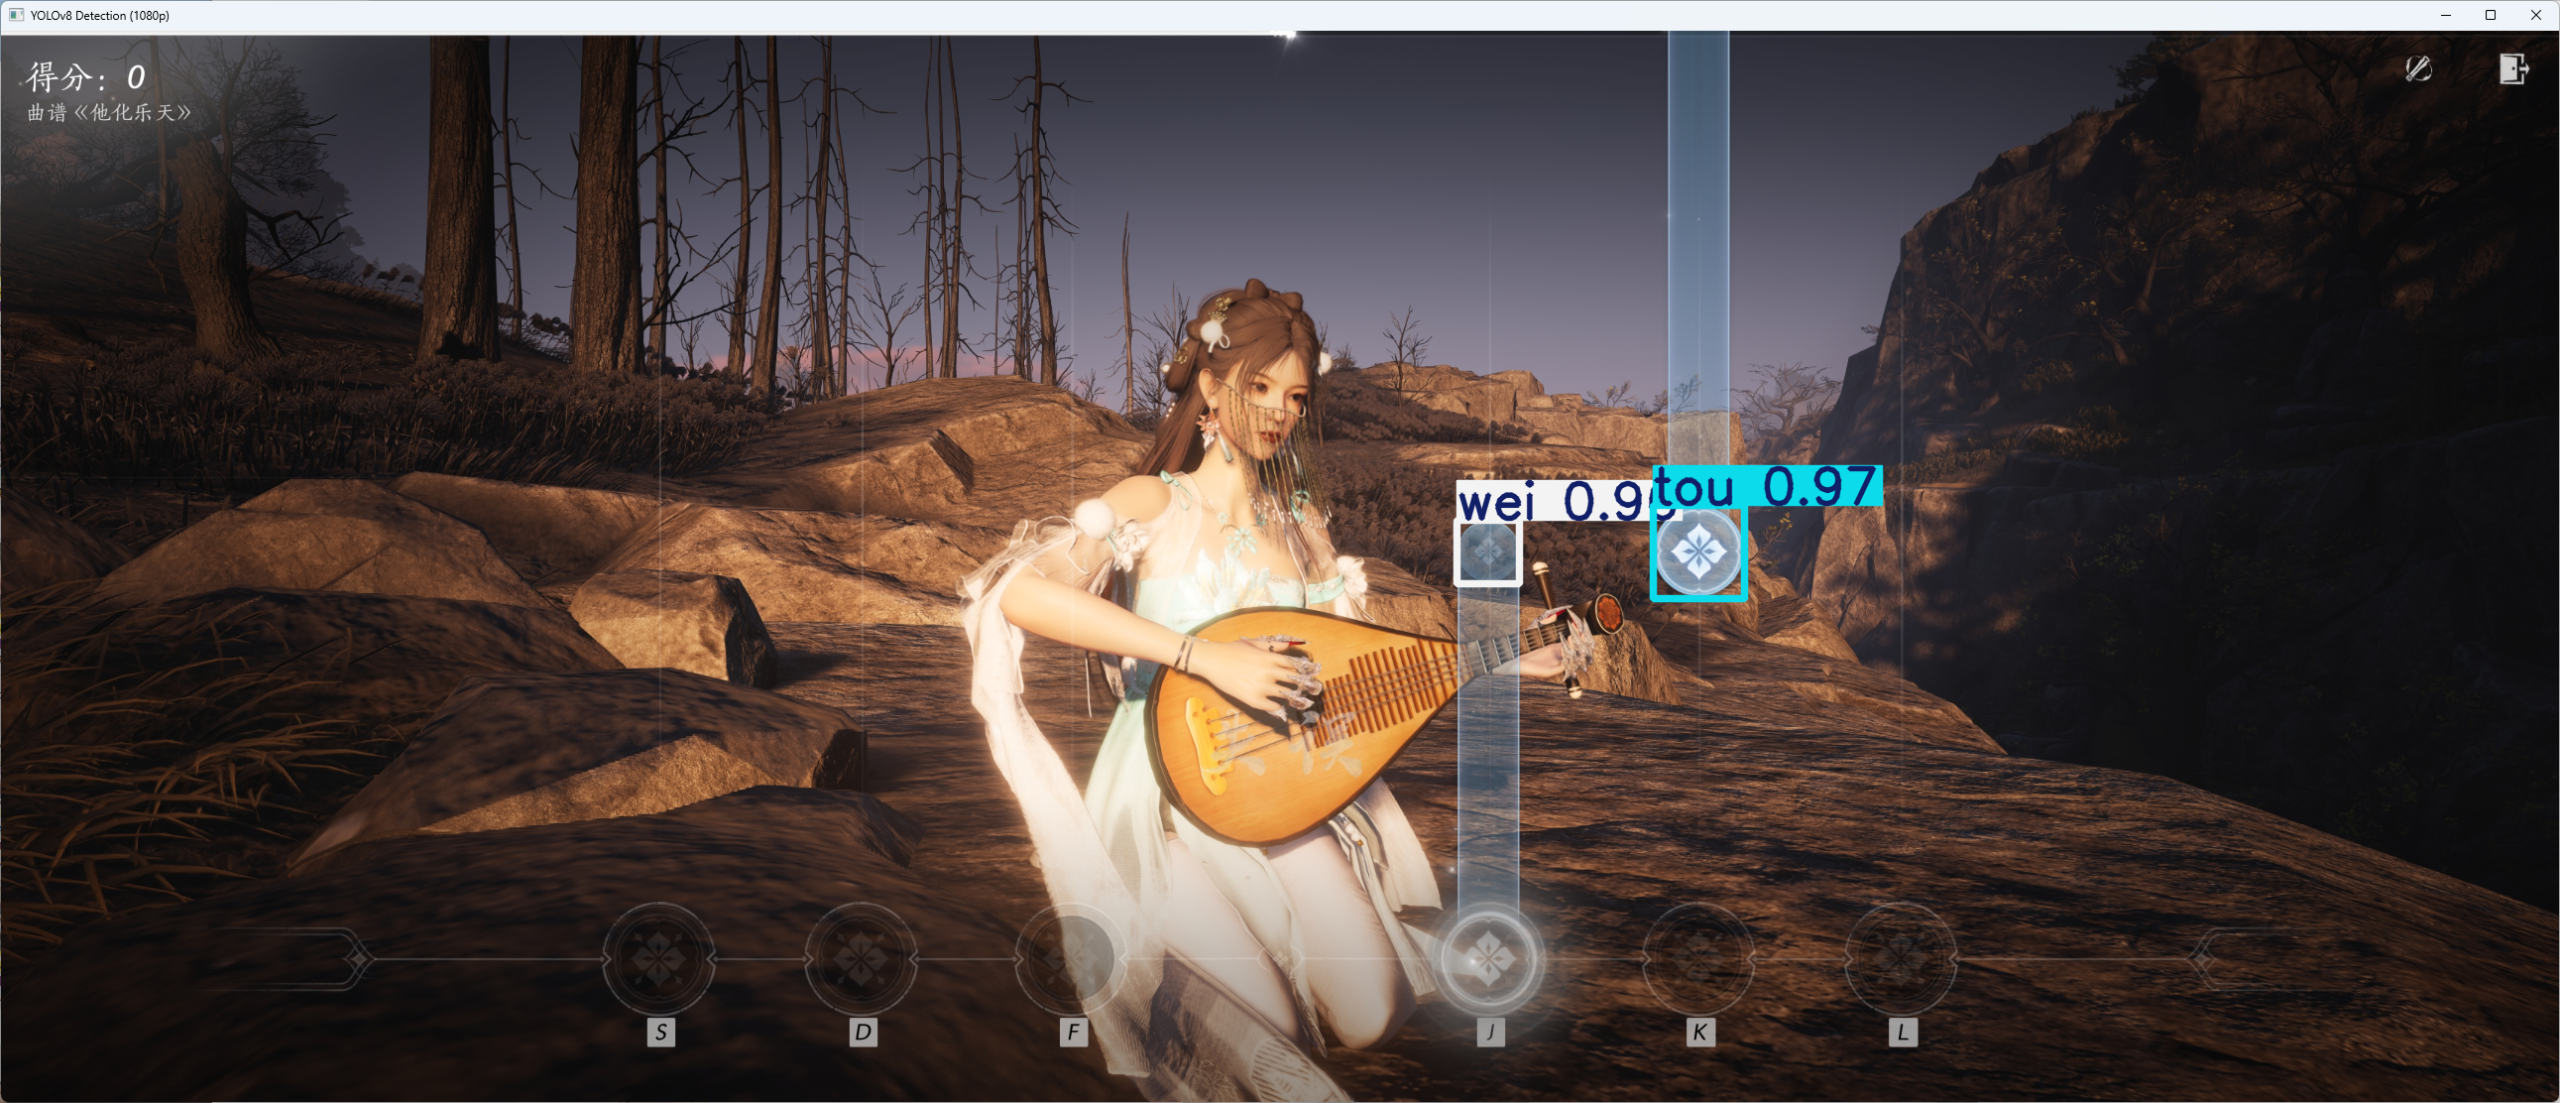
检测结果如下,可以看出来算是非常完美了。
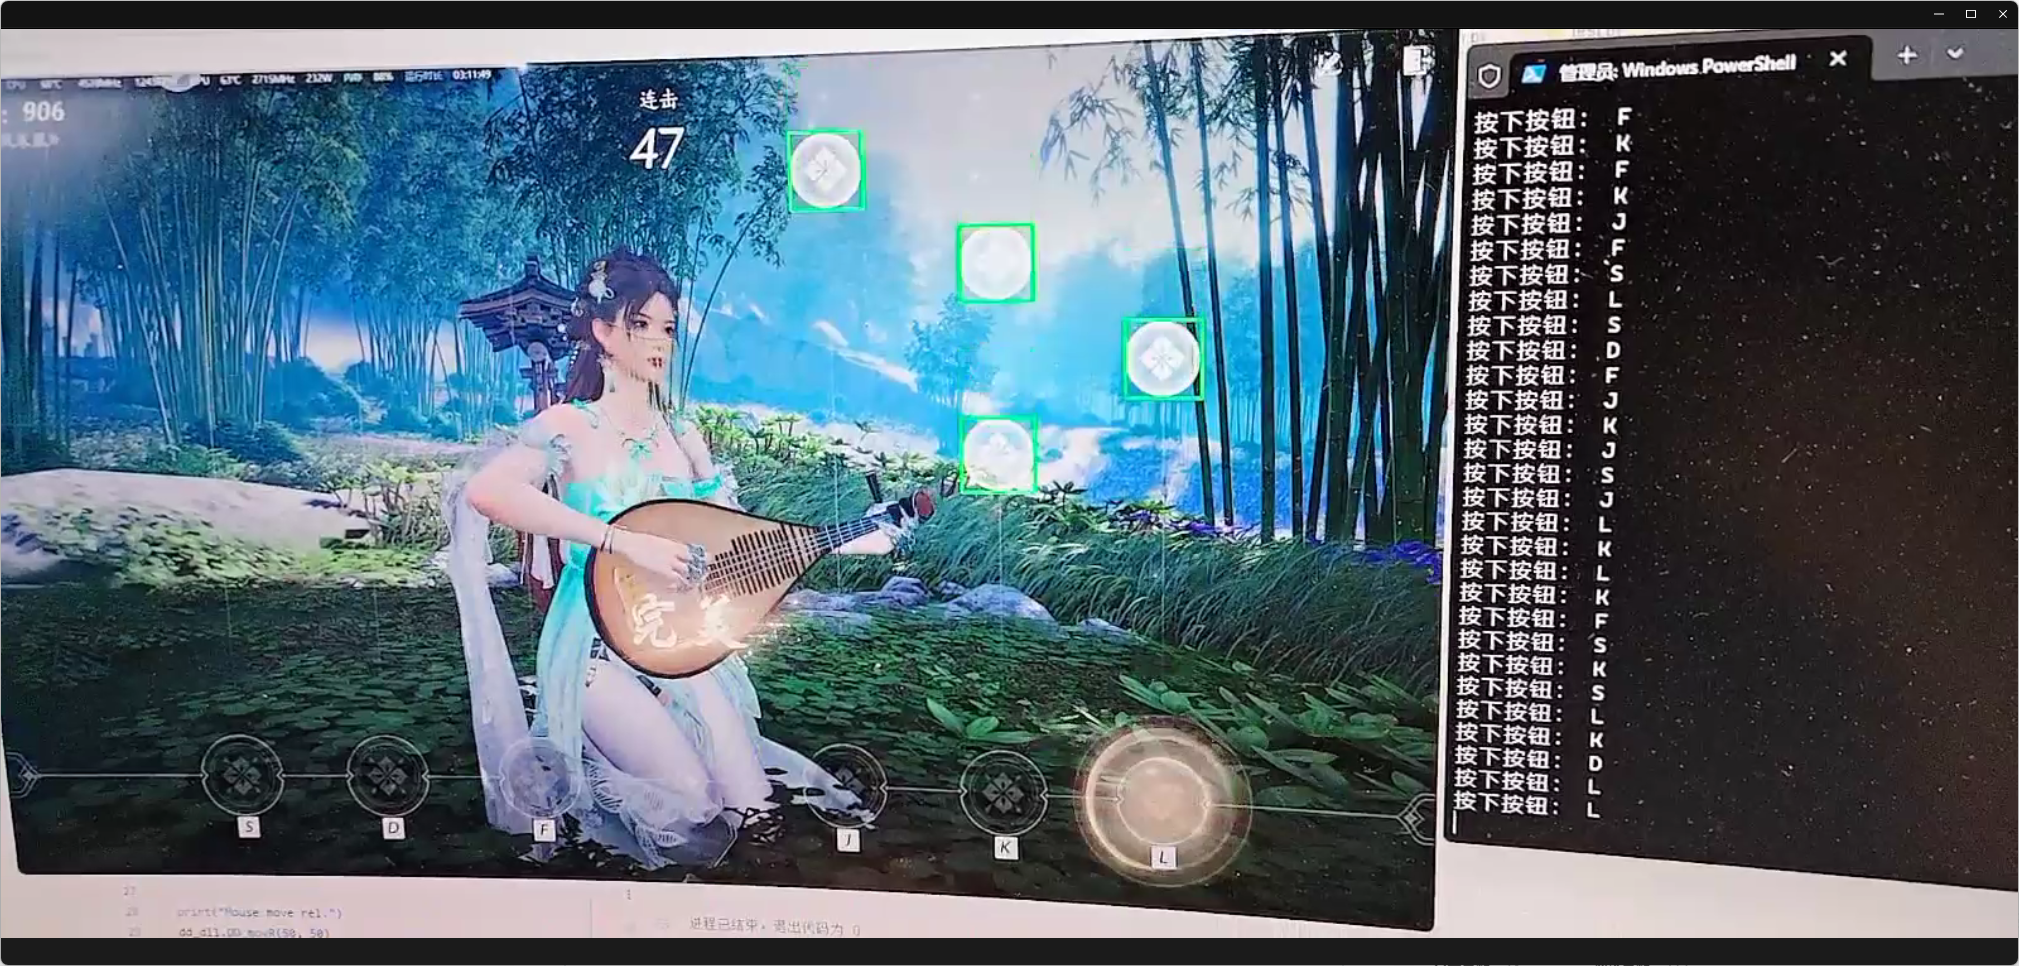
实际应用
因为未知原因的后台资源暴跌,所以我们把检测程序分为客户端、服务端两部分,中间通过Websocket来进行通信。
客户端放在本机运行游戏的电脑上,对屏幕进行截图,统一将图像从2560*1440压缩到1280*720(加快传输的检测速度),然后通过Websocket发送到服务端;服务端接收到图像后,进行检测,并把检测结果发送到客户端;客户端根据结果坐标,还原为2560*1440的实际点位,并计算音符中心点位坐标。再通过下方槽位在画面中的比例,计算槽位中心位置。当识别到音符坐标到了实际槽位的中心坐标时,按下相应的按钮(通过dd_key来控制)。为了应对可能存在的检测延迟问题,适当将判断坐标上移50-100像素。
服务端代码:
# server.py
from fastapi import FastAPI, WebSocket, WebSocketDisconnect
import cv2
import numpy as np
import asyncio  # 注意引入 asyncio
from ultralytics import YOLO

app = FastAPI()

# 加载 YOLOv8 模型(确保模型文件正确)
model = YOLO("./pt/best.pt")

@app.websocket("/ws")
async def websocket_endpoint(websocket: WebSocket):
    await websocket.accept()
    try:
        while True:
            # 阻塞方式接收一帧
            data = await websocket.receive_bytes()

            # 快速刷新缓存:在极短时间内检查是否有最新的帧数据到达,若有则覆盖旧数据
            while True:
                try:
                    # 设置一个极短的超时(例如 1 毫秒),不断尝试接收消息
                    extra_data = await asyncio.wait_for(websocket.receive_bytes(), timeout=0.001)
                    data = extra_data
                except asyncio.TimeoutError:
                    break

            # 将字节数据转换为 OpenCV 格式图像
            np_arr = np.frombuffer(data, np.uint8)
            img = cv2.imdecode(np_arr, cv2.IMREAD_COLOR)
            if img is None:
                continue

            # 使用 YOLOv8 进行目标检测
            results = model(img)
            detections = []
            for result in results:
                if result.boxes is None:
                    continue
                boxes = result.boxes.data.cpu().numpy()
                for box in boxes:
                    x1, y1, x2, y2, score, cls = box.tolist()
                    # 计算检测框中心点
                    cx = (x1 + x2) / 2
                    cy = (y1 + y2) / 2
                    detections.append({
                        "x1": x1,
                        "y1": y1,
                        "x2": x2,
                        "y2": y2,
                        "score": score,
                        "class": int(cls),
                        "center": {"x": cx, "y": cy}
                    })

            # 将最新帧的检测结果发送给客户端
            await websocket.send_json(detections)
    except WebSocketDisconnect:
        print("客户端已断开连接")

if __name__ == '__main__':
    import uvicorn
    uvicorn.run(app, host="0.0.0.0", port=8085)
客户端代码(简易):
# client.py
import asyncio
import cv2
import numpy as np
import json
import time
import mss
import websockets
from ctypes import windll

dd = windll.LoadLibrary("lib/dd43390.dll")
st = dd.DD_btn(0)  # DD Initialize
if st == 1:
    print("虚拟键鼠加载OK")
else:
    print("Error")
    exit(101)
play_mode = 0  # 0 单人模式 1双人左边 2双人右边

# 1440P 各按键区域(x方向)及垂直高度范围(y方向)的设置
key_pos_x_map = [
    [444, 717, 998, 1562, 1842, 2114],  # 单人模式
    [152, 306, 459, 696, 851, 1005],  # 双人模式 左边
    [1553, 1707, 1863, 2098, 2249, 2409]  # 双人模式 右边
]
offset_pix = 50  # 提前量
s_key_range = [key_pos_x_map[play_mode][0] + x for x in (-100, 100)]
d_key_range = [key_pos_x_map[play_mode][0] + x for x in (-100, 100)]
f_key_range = [key_pos_x_map[play_mode][0] + x for x in (-100, 100)]
j_key_range = [key_pos_x_map[play_mode][0] + x for x in (-100, 100)]
k_key_range = [key_pos_x_map[play_mode][0] + x for x in (-100, 100)]
l_key_range = [key_pos_x_map[play_mode][0] + x for x in (-100, 100)]
h_height_range = (1247 - 100 - offset_pix, 1247 + 100 - offset_pix)

# 设置服务端 WebSocket 地址(根据实际情况修改)
WS_URI = "ws://localhost:8085/ws"
last_press_time = time.time()
last_press_key = ""
key_map = {
    "s": 402, "d": 403, "f": 404, "j": 407, "k": 408, "l": 409
}

async def send_receive_loop():
    async with websockets.connect(WS_URI) as ws:
        print("websocket 连接成功!")
        with mss.mss() as sct:
            # 根据实际情况选取监视器:此处辅屏为 monitors[1]
            monitor = sct.monitors[1]
            while True:
                # 截取辅屏图像(1440P原图)
                sct_img = sct.grab(monitor)
                img = np.array(sct_img)
                img = cv2.cvtColor(img, cv2.COLOR_BGRA2BGR)
                # 压缩到 720P(1280x720)
                img_720 = cv2.resize(img, (1280, 720))

                # JPEG 编码图片
                ret, buffer = cv2.imencode(".jpg", img_720, [cv2.IMWRITE_JPEG_QUALITY, 80])
                if not ret:
                    continue
                jpg_bytes = buffer.tobytes()

                # 发送图片数据到服务端
                await ws.send(jpg_bytes)

                # 接收检测结果,并刷新队列,只保留最新结果
                detections = None
                try:
                    # 等待检测结果,设置初始超时 0.5 秒
                    response = await asyncio.wait_for(ws.recv(), timeout=0.5)
                    detections = json.loads(response)
                    # 快速刷新接收队列:利用极短超时不断尝试接收新消息
                    while True:
                        try:
                            response = await asyncio.wait_for(ws.recv(), timeout=0.001)
                            detections = json.loads(response)
                        except asyncio.TimeoutError:
                            break
                except asyncio.TimeoutError:
                    detections = []  # 超时则丢弃本帧检测结果

                if detections is None:
                    detections = []

                # 在 720P 图像上绘制检测框
                for det in detections:
                    x1 = int(det["x1"])
                    y1 = int(det["y1"])
                    x2 = int(det["x2"])
                    y2 = int(det["y2"])
                    score = det["score"]
                    cls = det["class"]
                    if score < 0.92:
                        continue
                    # 计算检测框中心坐标(720P下)
                    cx = int((x1 + x2) / 2)
                    cy = int((y1 + y2) / 2)
                    if play_mode == 1 and cx > 640:  # 右边无视
                        continue
                    elif play_mode == 2 and cx < 640:
                        continue
                    # 映射至 1440P 的坐标(放大2倍)
                    cx_1440 = cx * 2
                    cy_1440 = cy * 2

                    cv2.rectangle(img_720, (x1, y1), (x2, y2), (0, 255, 0), 2)
                    # 根据中心坐标判断是否落在指定按键区域内
                    if h_height_range[0] <= cy_1440 <= h_height_range[1]:
                        if s_key_range[0] <= cx_1440 <= s_key_range[1]:
                            if cls == 1:
                                await hold_key("s")
                            elif cls == 2:
                                await release_key("s")
                            else:
                                await press_key("s")
                        elif d_key_range[0] <= cx_1440 <= d_key_range[1]:
                            if cls == 1:
                                await hold_key("d")
                            elif cls == 2:
                                await release_key("d")
                            else:
                                await press_key("d")
                        elif f_key_range[0] <= cx_1440 <= f_key_range[1]:
                            if cls == 1:
                                await hold_key("f")
                            elif cls == 2:
                                await release_key("f")
                            else:
                                await press_key("f")
                        elif j_key_range[0] <= cx_1440 <= j_key_range[1]:
                            if cls == 1:
                                await hold_key("j")
                            elif cls == 2:
                                await release_key("j")
                            else:
                                await press_key("j")
                        elif k_key_range[0] <= cx_1440 <= k_key_range[1]:
                            if cls == 1:
                                await hold_key("k")
                            elif cls == 2:
                                await release_key("k")
                            else:
                                await press_key("k")
                        elif l_key_range[0] <= cx_1440 <= l_key_range[1]:
                            if cls == 1:
                                await hold_key("l")
                            elif cls == 2:
                                await release_key("l")
                            else:
                                await press_key("l")

                # 显示检测后的图像(720P)
                cv2.imshow("yysl", img_720)
                if cv2.waitKey(1) & 0xFF == ord('q'):
                    break

async def hold_key(key: str):
    k = key.lower()
    code = key_map.get(k)
    dd.DD_key(code, 2)
    print("⌨ 按住↓按钮:", k.upper())
    dd.DD_key(code, 1)

async def release_key(key: str):
    k = key.lower()
    code = key_map.get(k)
    dd.DD_key(code, 1)
    print("⌨ 松开↑按钮:", k.upper())
    dd.DD_key(code, 2)

async def press_key(key: str):
    global last_press_time
    global last_press_key
    k = key.lower()

    cur_time = time.time()
    if cur_time - last_press_time < 0.2 and last_press_key == k:
        return 0

    if not isinstance(key, str):
        return 0
    code = key_map.get(k)
    if not code:
        return 0
    print("⌨ 按下按钮:", k.upper())
    dd.DD_key(code, 1)
    dd.DD_key(code, 2)
    last_press_key = k
    last_press_time = time.time()

if __name__ == "__main__":
    try:
        asyncio.run(send_receive_loop())
    except KeyboardInterrupt:
        pass
    cv2.destroyAllWindows()
客户端和服务端都采用了“超时丢弃”的机制,当截屏速度大于识别速度时,会丢弃过时的帧,自动获取、识别返回最新的帧,防止出现识别延迟的情况。
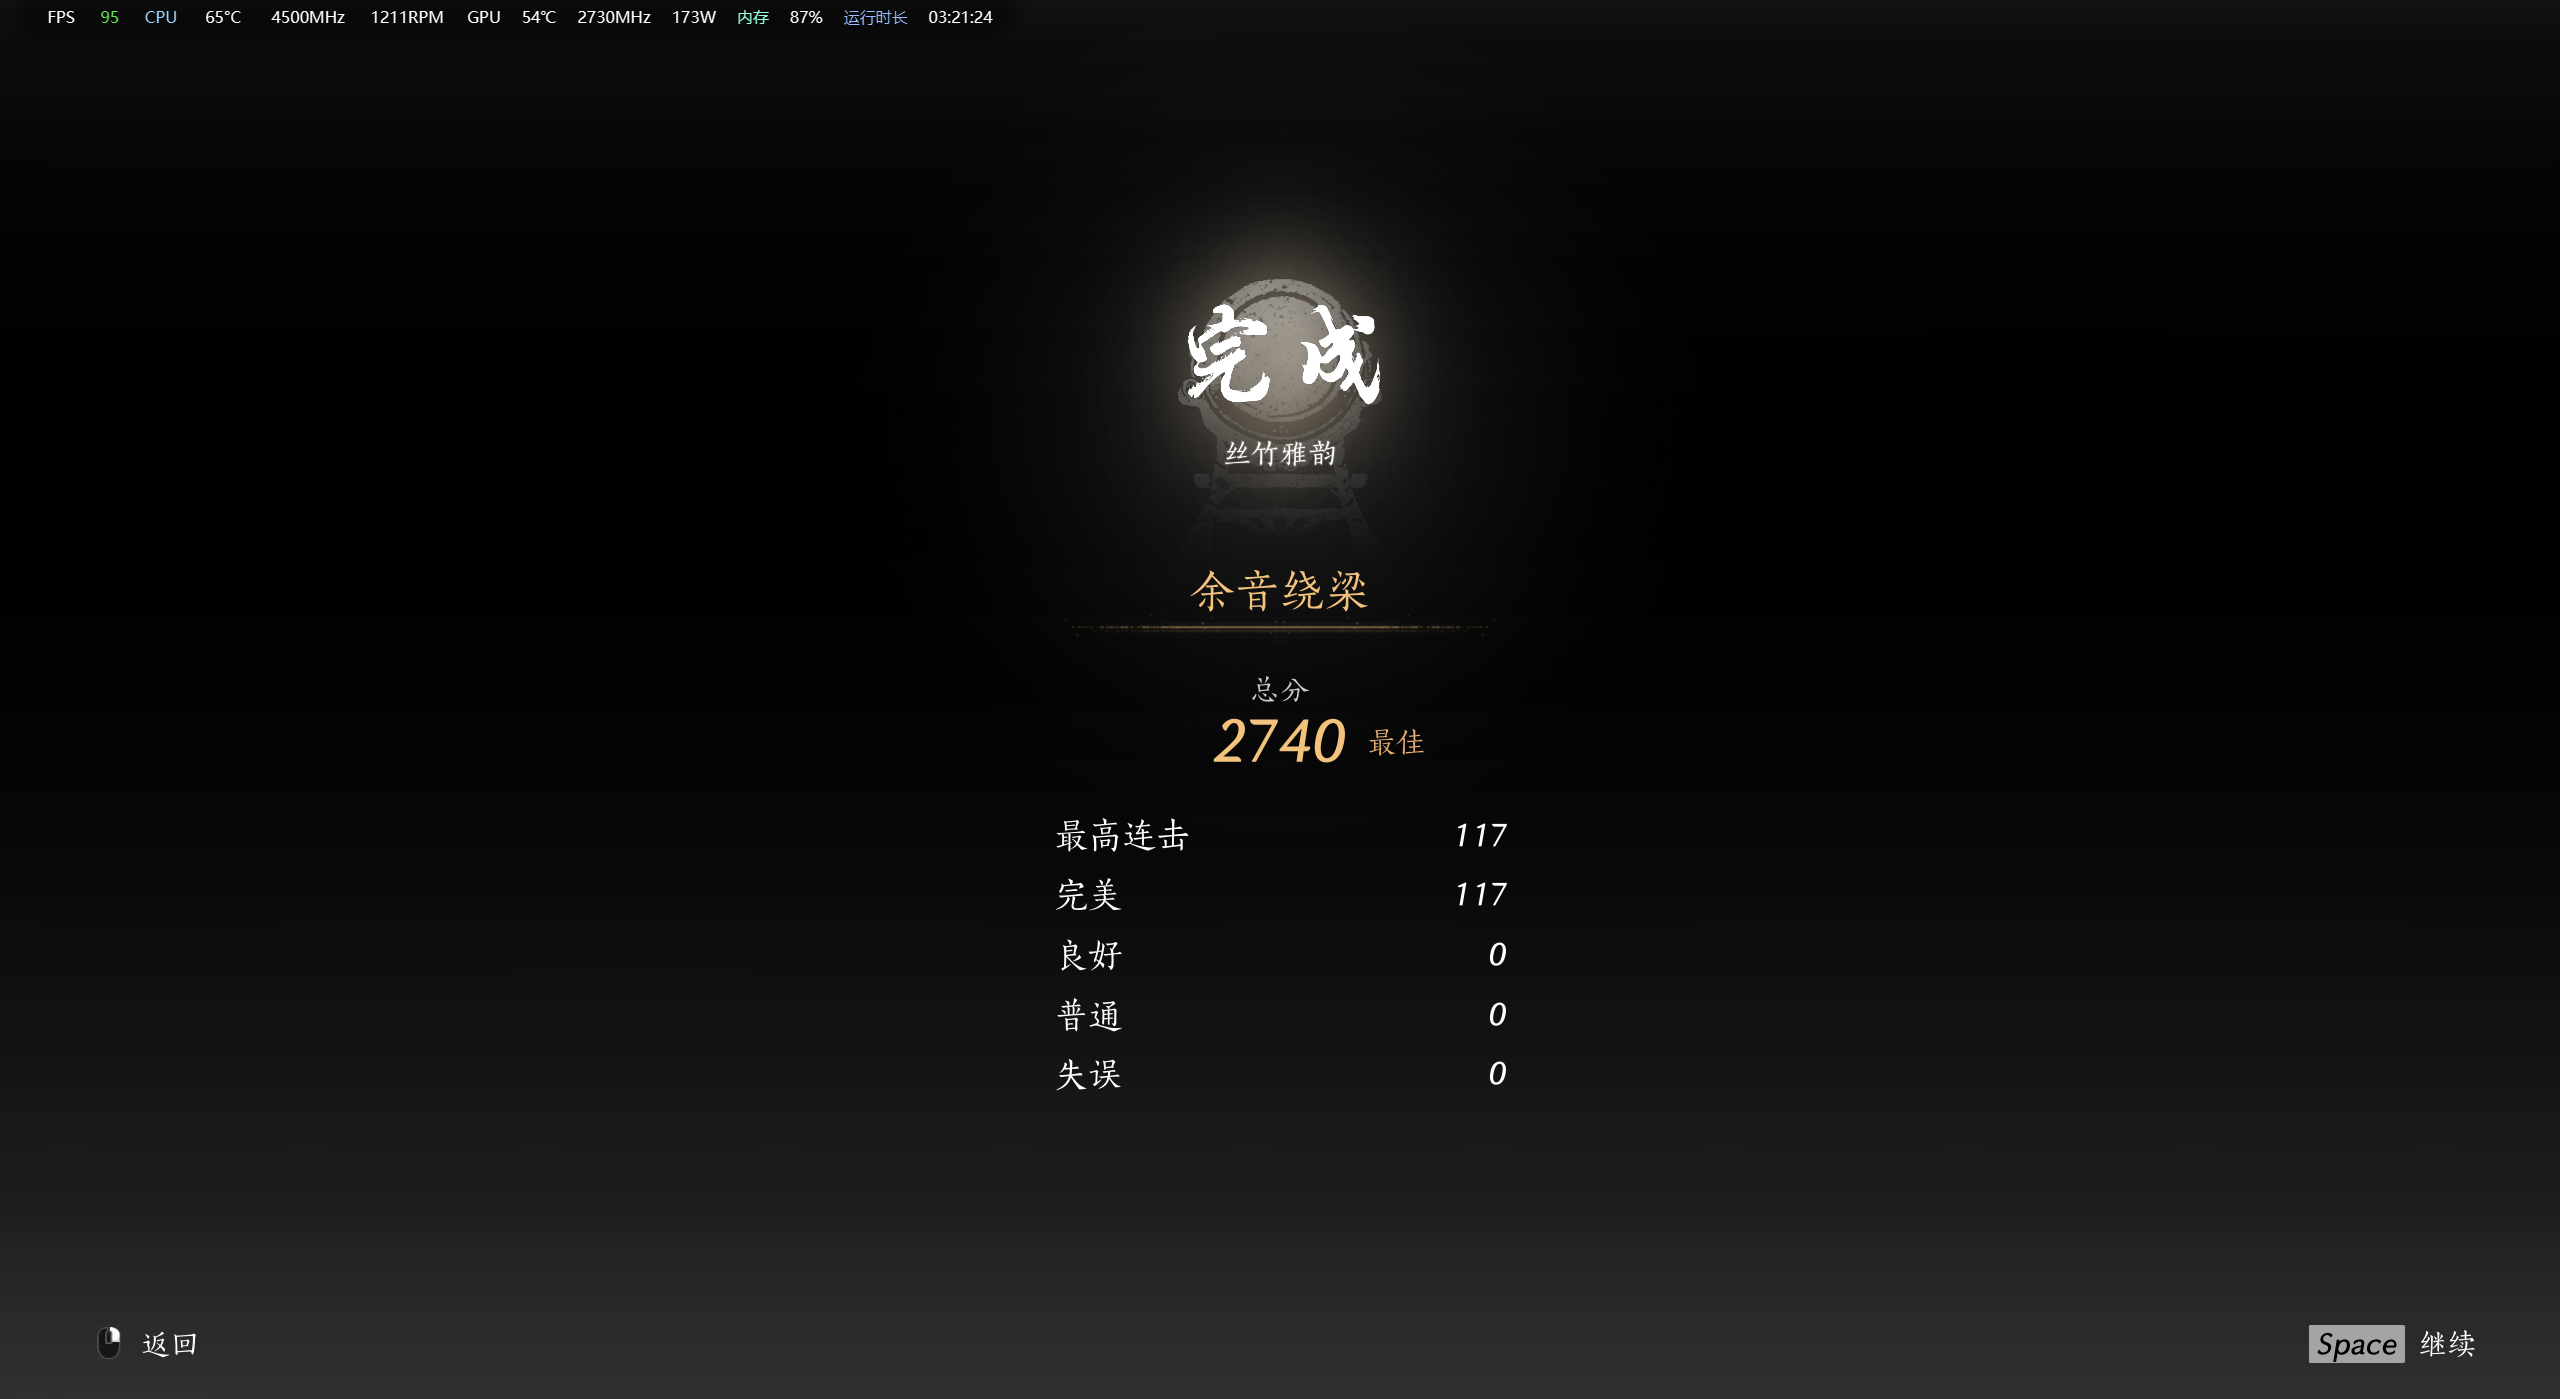
通过client+server的模式,实际识别帧率会有所降低。我试了一下,平均能到达22fps左右,基本没有出现漏点、误点的情况,对按住、松开这种音符操作模式也有很好的兼容性。这下终于不用当手残了!!
后记
本文讲的是完成一个游戏“挂”,但实际上涉及了完整的计算机视觉目标识别的流程。搞懂了这个流程,对于其他类型的识别,只需要自己收集素材、标注、训练即可完成自己想要的识别模型。YOLO真的是一个优秀的识别框架,识别速度快、精准,且耗系统资源少,有兴趣的可以去研究看看。特别是最近ChatGpt和deepseek一出来,LLM方向的AI百花齐放,大家也可以结合这二者,看看能不能做出点有意思的东西出来。